Even though I swore at a young age never to be seen in, much less own a generic import sedan, here we are.
I bought this 95 Avalon at auction with the nose totaled. While it was meant to be a winter beater, it has grown on me simply based on it’s ease of repair. This job required few tools, none of which were unusual. This was a welcome break from the maddening array of crap required to do a similar job on my SHOs.
So the local shop must have told you that this job costs $600+ because ‘That whole durned intake thingy has to come off’. He is right, the intake has to come off. However, if you do the job yourself you can take that $600 you saved and buy something fun for yourself or the missus.

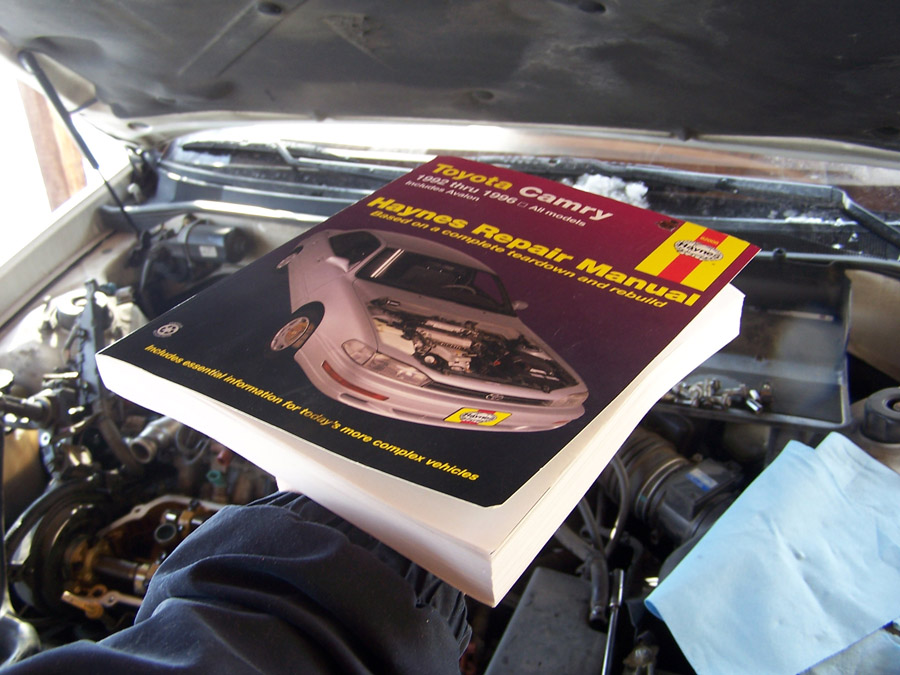
First, get the Haynes Toyota Camry Automotive Repair Manual
( and any other car you may own ) and a set of Gear Wrenches with the floppy heads. These wrenches are the best ever, replace socket sets and save time and effort getting into weirdly located nuts and bolts. When you dish out your $129 for the wrench set, comfort you wife by telling her you are saving $600 on the job and you will have the proper tools to do future jobs. Be careful though, if you use that reasoning with the missus, she will in fact ask you to do other car related jobs. You have been warned.
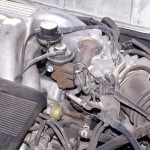
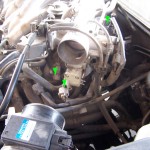
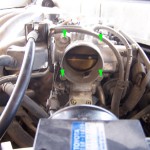
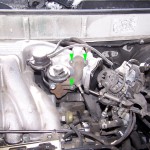
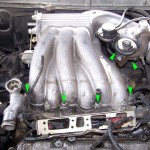
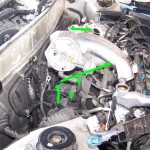
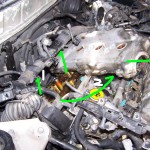
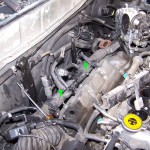
This page will show pretty much step by step directions, but you must use common sense and look for wires, plugs or other things to disconnect in case I miss them. I have included many pictures called ‘reference pictures’. These will show how things look before you tear them apart, so you have a guide to put them back together. Use common sense. I am not responsible if you break something or hurt yourself or others.


I must say this is a great article i enjoyed reading it keep the good work 🙂
Great job. Exactly what I was looking for. Great pics and tips!
You did a helluva job there, fella! Great pics and a good article. Keep up the good work.
Great just Great.
Wow, the ‘big boy’ publishers could sure take a lesson here. How to do it illustrated, on the most common problem of this otherwise excellent engine. Kudos!
Thank you so much! This was extremely helpful!!!!!!
This is simply and excellent guide. Now I’m really looking forward to take off my valve covers on my 1999 Avalon.
Great DIY! Could you do one for the timing belt now!!!?
Fantastic! Thank you. The repair manuals are so unhelpful when it comes to the tricky nuances of getting to these impossible to reach places.
Excellent, this is what I was looking for as well. Just got a ’95 and same condition as the pics show. Thank ya.
Did the plugs come out easy after being in the engine for ? years. My 2004 Camry V6 will be needing plugs soon and I am concerned that the threads in the head will come out with the plug. I want to believe that Toyota used some kind of anti-sieze but who knows. Very good presentation. PS Why did you take the valve covers off?
A: Yes.
B: they were leaking.
Thank you so much for this DIY.
I now have a visual guide to help me do this job.
Do you have any other DIY for this car and/or engine?
Not yet, nothing else has broken.
I am blown away! I did front cover yesterday and then wondered how I was going to move that wire bundle. Your efforts are invaluable!!!!!!!!!!!
Today I attack the back cover armed w/ the info you provided.
God bless you!
yep
Great DIY. Besides the new valve cover gaskets and the plenum gasket, did you replace any other gaskets, or just reuse the old?
Just the VC ones, I re-used everything else.
Very greatful for your attention to detail; I’ve been wanting to do this job for a while now.
No problem… If anything else ever needs work on this car I’ll post it the repair here too!
great job…I have been dreading and postponing this for over a year or so… I will tackle it tomorrow ….
Thank you so much for showing us the way. My front one has an obvious leak. I was not going to tackle the back valve cover gasket until I read your post. You make us look like geniuses to the Missus. Also thanks for reminding us to replace the spark plugs.
If the missus can’t find you handsome, she should at least find you handy.
Great guide for this job – I have a 1999 Sienna and the dealership wanted $600 for valve cover gasket R&R. I feel better when it’s my labor – knowing I didn’t cut corners…..
R&R’d the radiator last week – dealership wanted $600 for that job – I did it for $175
I was struggling with the rear valve cover on my 98 Avalon and your article was my saving grace. Thanks a bunch for the great pics and explanation.
Im glad people still find this article!
I am changing the rear valve cover first. Great pics. I am so glad I stumbled on your site! I noticed some snow in one picture on the windshield. I could not have do it with you.
I have a 1995 ES300. In my cold NW New York climate, heat is a good thing, but not when it smells like burning oil because the valve cover gasket leaks!
I am so confident to go do this because of your tutorial! Thank you so much! this was a true blessing.
Now… How about a gas tank that seems to over fill and make the inside of the car smell like gas but doesnt leak? tripped the Check Engine code for EGR (or the timing was a coincidence)
First of thanks for such a great DIY.
I am stuck on removing the bolts near the firewall in the fifth photo of your second page.
There is a 14mm nut inside that metal bracket with only about an inch of room.
It is too small of space for me to get my socket set in there between the wrapped metal pipe and the formed bracket.
If you have any pointers on what I can do it would be great.
Again thanks!
Gearwrench. done.
I thought I poseted this earlier – so sorry if i did it twice…
anyway, the harness had a bolt that was hidden, 2 on the middle of the back valve cover, one at almost the end of the top of the valve cover on the drivers side, and then another that you pointed to on the drivers side. With those 5 out, the harness wont budge off of the drivers side, and I cannot see why.
Please, please help. I need to get this thing back on the road =(
thank you so much
Something’s holding it…. It has been years since I did this job but If I recall correctly there were more than 5 total, just have to feel around there until you find the one that’s not out yet. Could be a nut, bolt, plastic clip…. Sorry I don’t remember for sure.
Nice tutorial, can you tell me approximately how much time is required for this work. Thank you.
About 6 beers. 12 if you have a friend help.
Bought Chilton. Bought the toyota repair manual. Your pics and explanation ended up helping more than both of them. Thanks a great deal.
The hardest part for me was dealing with the wiring harness which skirts the rear valve cover gasket. I had to remove some connectors to get more play.. I’ve just removed everything, tomorrow i pick up some additional parts from toyota and start the assembly with the new gaskets , spark plugs , spark plug wires, half moons. I will probably be saving about $800 easy.
Thank you very much.
To fix the leaking rear valve cover gasket, first attempt to tighten all the bolts, they loosen up over time. You may need to move the brackets, take off the bolt and the bracket swings out of the way. And yes, gear wrenches 10mm and 12mm indispensable.
Kudos for this video. There are a few other u-tube videos on this topic, so there are a heck of a lot of Toyota’s out there now that are having this problem, but this video doing the step-by-step process is spot on! And I do have the Haynes manual for all my cars, they are well worth the small price, it will payback several times over.
I had an 1999 Avalon and had the leaking and burning oil from the back valve cover and paid to get it fixed.
Now my 2001 Sienna Van with 264,565 miles (and going strong I might add) is having the same problem. I was leary to try to do this repair, but I will do a three for one fix; the valve cover gaskets, the plugs, and replace two of the coil-on-plugs as the eventually go, so I will do this once and be done.
Thanks again for the video lesson.